Thursday, March 31, 2011

Let's Play a Game! (Printable included)

Sweet Girl is just starting to understand the concept of games (rules and turn taking and the such) so I created a little game for us to play.  It's really simple, but lots of fun and I'd thought I'd share with you all.


Here are all the game pieces!!

Basically, Sweet Girl and I take turn rolling the dice to see what color we get.  Then, we get to pick out our teddy bear and place it on the mat.  We have these teddy bear counters so we use the big and little ones to correspond with our circles.  Oh...and I made our dice using colored stickers and a blank dice (I found mine at the dollar store, but you can get them here for $0.25+shipping. 

The one who fills in the last circle wins!! 

I love that the game touches on so many different skill areas....turn taking, attention/concentration, color recognition, matching, big vs. little.

Wanna play too? 
Just click here to print out your own mats.  I recommend cutting out and laminating your mats for durability.  And if you don't have colored counters....just print out two copies of the mats, cut out all the circles of one set of mats and use those as your "game pieces". 


Linking to:
For The Kids Friday, Preschool Corner, Tot School

Wednesday, March 30, 2011

ABC Fun - Letter H

H is for.....HAPPY BIRTHDAY!!

That's right!!  Today is Sweet Girl's 2nd birthday!!  What a perfect week for letter H!!

Alphabet Sensory Bin
This is our sensory bin for the letter H.  It contains:  capital H's, a horn, a hamburger, two hippos, a bunch of heart buttons, heart eraser and a horse.


H is for.....house
I saw this idea over at I Can Teach My Child and thought it would be great for our letter H week.  It was sooooo simple to make and is such a great learning tool.  The door and windows lift and underneath is a picture that begins with the letter H sound (the hearts are pictured on the right side). 


Build an H
For this activity, Sweet Girl will use the different "sticks" to build a letter H.  The "sticks" are popsicle sticks, cocktail stirrers and pieces of paper.

What do you hear?
I printed out the sheet above with different pictures of things that begin with the letter H.  Then I found sound clips of all the different objects.  I plan on giving Sweet Girl the pictures, playing the sounds for her and having her guess which one it is.  We haven't tried any listening skills games yet, but I think it will be fun!


And of course, there will be LOTS of "Happy Birthday" singing to Sweet Girl today!!!

Check back on Friday to see our letter H crafts!!

Tuesday, March 29, 2011

The Versatile Blogger Award


A great big hugemongous THANK YOU to Natalie from NatSprat for awarding me The Versatile Blogger award!!  Natalie's blog is amazing and I am beyond thrilled that she would nominate me! 
 
So apparently the rules of the award are: 1) Thank and link back to the person who nominated you; 2) Share seven things about yourself; and 3) Give out the award
 
Ok...here goes....here are seven things about me you probably didn't know!!
 
1.  I danced in the Macy's Thanksgiving Day Parade when I was in the 10th grade.
 
2. I competed in gymnastics when I was younger and scored a 9.86 on the vault at one of my meets.
 
2. I "fake-moved" to Charlotte, NC for ONE DAY.  No, seriously, I really did.  My family moved me down, unpacked me one day and then packed me up and moved me out the next.  Guess I wasn't quite ready to grow up, huh?
 
3. I am freakish-ly strong.
 
4. I can pick lots of things up with my toes...and use this talent frequently.
 
5. I love the smell of baby spit-up.  Gross, I know!!
 
6. All of my t-shirts (and socks) have holes in them.
 
7. I got a paper cut on my eyeball in the 6th grade and had to wear an eye patch for months.....can anybody say, argh???
 
And the fabulous bloggers I'd love to nominate are:
Rachel at Sun Scholars
 

Momma made....My Busy Box

I'd like to you meet my new best friends!!!

SWEET GIRL'S BUSY BOXES

When I was preggo with Little Man, I put together several activity bags for Sweet Girl.  My thought was that I would give her an activity or two when I was nursing or when I needed to do something.  And she played with them.....for about 5 minutes.  Unfortunately, it usually takes me WAY longer than 5 minutes to do anything these days, so I needed a little longer.  So......I took all the activities I had already put together, as well as some extra stuff I found around the house and made these super neat busy boxes.  Just looking at them makes me want to be two again!!


Wanna see what's inside our boxes???
  • Mini Mr. Potato Head
  • Mess Free Color Blast book
  • Foam number puzzle
  • Stickers and paper
  • 3 small books
  • Alphabet flashcards

  • Mini cow puzzle
  • 3 books
  • Colored linking cubes
  • Finger puppets
  • Winnie the Pooh number flashcards
  • Stickers
  • Soft ball

  • Small lego set
  • Mini I Spy bag
  • Farm puzzle
  • Transporation counters
  • Stickers
  • 3 books
  • Picture flashcards

  • Princess dominos
  • First words flashcards
  • ABC foam puzzle
  • Princess figurines
  • 3 small books
  • Peg board
  • Princess coloring book with 5 crayons
  • Stickers

The boxes have been great and definitely entertain her for about 30 minutes.  I made sure that everything in the boxes (containers, boxes, etc) were easy for her to open so she could do it herself.  I plan on changing out the items after several uses just so she doesn't get bored with the boxes.  And....since I'm obsessed with the dollar store and dollar section at Target, I'm sure I won't have any trouble finding some new goodies.


What about you?  How do you keep your little one "busy"?  Please share!  I always love finding new ways for Sweet Girl to have some independent play time!


Linking to:


Monday, March 28, 2011

Tot Trays - "It's My Birthday!!"

Yay!!  It's birthday week for Sweet Girl!!  I can't believe she will be TWO YEARS OLD this week!  Happy early birthday to the sweetest and cutest girl I know!! 

Here's our birthday-themed tot trays for this week!!  I think Sweet Girl will love them all!!

Candle counting
I love this tray and I know Sweet Girl will too!!  I went ahead and did this tot tray so you could see it, but basically I will give her the play dough and candles and let her make her own cupcakes and put the right number of candles in.  She is doing such a great job with counting!! 


Cupcake matching
She loves this game and occasionally asks for it when we are playing.  I might try to throw in a simple memory game too!  Click here if you want to see how easy it is to make!!


Candle drop
Simple activity using candles and an empty gum dispenser


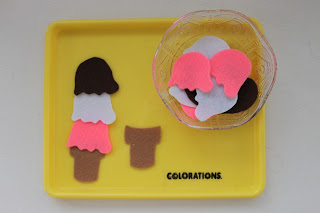
Ice cream patterning
I cut out these felt ice cream scoops and ice cream cones for a simple patterning activity.  I also plan on using it as a matching game too!


Open and close "presents"
For this one, I gathered a couple empty jewelry boxes and filled them with some of Sweet Girl's play jewelry.  You know the girl LOVES to accessorize!


Build a cupcake
I cut out the parts to "build" a simple cupcake.  The one on the left is already completed for her so she will have a something to copy. 


Tot School

Saturday, March 26, 2011

10 Fun Learning Games Using Plastic Eggs

Here are some egg-celent learning games to play with your child!!


Hide-n-seek puzzles
We used this game for our letter E activities a few weeks ago and Sweet Girl really enjoyed it.  All you do is print off some pictures, cut them in half and place one half in an egg and the other half in a different egg.  This is a great activity for language development since you can talk about the object once your little one finds the matching pieces.   For Sweet Girl, I used all objects that began with the letter E sound to reinforce our letter/sound of the week.


Egg counting
I picked up some stickers at the dollar store and put the numbers 1,2,3 on the eggs.  You can have your little one count and add just about anything to the eggs (pom poms, pasta, paper, stickers, erasers...).  This activity also works on fine motor skills since they have to open/close the eggs.


Capital and lowercase letter matching
For this one, place the capital letter on one half of the egg and the lowercase letter on the other half.  Then mix up all the pieces and have your little one match up the capital and lowercase letters.  This can also be used with all capital letters or all lowercase letters to work on letter recognition.


Egg word scramble
This is an activity for older children who are working on spelling.  All you need is some alphabet letters and either matching objects or pictures.  Place both the letters and the object in the same egg.  Explain to your child that each egg contains an object (or picture) and the letters that spell that object.  Then have them open the egg and see if they can spell the word.


Object matching
For a simple task, have your little one open all the eggs and then find the matching pairs.  For older children or to make it a little more challenging, place all the eggs in an empty egg carton and play a little memory game. 


Egg memory game
This one is somewhat similar to the activity above.  Instead of playing a memory game where you try to find matching pairs, show your little one all the objects in the eggs and then place the tops on them.  Then ask your child, "Where is the pig?".  To make it easier just do one row at a time.


Sound eggs
Add a variety of things to your eggs (marbles, rice, bells, etc), super glue your eggs together and then have your child try to find two matching sounds. 


Emotional eggs
Use a marker to draw different faces on your eggs then separate your eggs.  Either tell a short story or talk about an emotion and have your little one try to make the correct face (ie. "When Susie went to the store with her mom she got a balloon.  How do you think Susie felt?").  For older children you can have them draw the faces on the eggs themselves.


Egg color matching
Super simple!!  Just separate your eggs and have your little one put them back together.


Rotten egg game
You can play this game two different ways.  For working on same/different, you can place like objects in all of the eggs except one.  Then add a different object to the remaining egg.  Have your child open the eggs and find which one doesn't belong or is different.  To work on turn taking, you can put a variety of objects in all of the eggs except one (leave this one empty...that's the rotten egg).  Then take turns opening eggs until someone gets the "rotten egg".


What about you??? 
Do you have any other learning games you do with your plastic eggs?  Please share!!

Linking to:


And are you following Playing House on Facebook?  Click here to "like" us and follow along!

Friday, March 25, 2011

Toddler crafts - Week in Review


Happy Friday!!  Here's a wrap-up of our crafty week!  Be sure to check out my post from yesterday, Spring Crafting Fun For Toddlers, for more fun and easy ideas!!


Toilet paper roll octopus
I don't know why, but Sweet Girl requested to make an octopus anytime I pulled out our craft supplies.  This was really easy to make and it's so cute.  First, paint a toilet paper roll and decorate with stickers once it's dry.  Then cut seven little slits in the bottom and fold up the edges to make the octopus legs.  Scrunch up a paper towel and stuff it into the toilet paper roll (try to round it out to make it look kind of like an octopus).  You can either use markers to decorate the "face" or just draw on eyes and a mouth.


The three bears (from Goldilocks and the Three Bears)
We used our felt storytelling board and read Goldilocks and the Three Bears.  Afterwards, Sweet Girl dressed the bears, gave them googly eyes and drew on a nose.  Then she read a story to them (and the octopus)!

Story Time!

Here are our letter G crafts or this week!

Glitter G
This made quite a mess, but Sweet Girl loved it since she got to use lots of glue and glitter.  (Quick tip....use a little bit of play dough to pick up any fallen glitter)


G is for....Guitar
Sweet Girl is my live-in-Ipod, so I knew she would enjoy this one!!  Check out No Time for Flashcards for directions!  It was so simple and fun to make! 


G is for....googly eyes
Oh my was this fun!  We laughed the whole time we were adding the eyes!


Here are my two favorites!!  That's Sweet Girl as a baby on the left!  She LOVED that one!!


And guess who's a rollin' rollin' rollin' now????
Love him!!


And just because it's too adorable not to post....


Happy Friday!


Thursday, March 24, 2011

Spring Crafting Fun For Toddlers

Looking for some fun Spring-y crafts to do with your little one?  Check out some of our recent Spring crafts, as well as some oldies, but goodies!!


Paper flower bouquet
These were super easy to make and Sweet Girl really enjoyed carrying around the "bouquet" once we were done.  To make these, just draw some flower shapes on pieces of construction paper, have your child paint them, cut them out once they are dry and then attach pipe cleaners as "stems".  What a lovely bouquet for a special mom or grandmother.


Flower faces
Sweet Girl and I made these for our Mimi last year, but I still love looking at them!  As with the flower bouquet, just draw your flowers and stems on construction paper and have your little one paint them.  Once dry cut them out, glue them on and add a sweet little face to the middle! 


Color mixing butterfly
Isn't he cute?  Check out B.Inspired mama for the super easy directions.


Shape Easter egg
We did this craft a few weeks ago to go along with our letter E activities, but it would be perfect for this time of year!!  All you do is cut out an egg from construction paper, cut out some shapes from sticky-backed foam and have your child decorate their egg.


Soda bottle flowers
This is a neat little craft!  Check out Frugal Family Fun for details.

Wednesday, March 23, 2011

ABC Fun - Letter G

We had lots of hands-on fun with letter F last week, but it's on to letter G and it's sound this week! 


Alphabet Sensory Bin
In our bin this week we have a bunch of letter G's, a goat, some grapes, a golf club, (eye)glasses, guitar and a glass. 


"G" scavenger hunt
I've planned a little scavenger hunt for Sweet Girl using things that begin with the "G" sound, as well as things that are green.  I plan on hiding the objects in our family room (I usually "hide" them where she can see them since hide-n-seek is a little new to her).  Then once she finds them she will have to say the word and then decide if it belongs with the "g" sound objects or the green objects.


Growing a gummy garden
Kinda silly, I know....but Sweet Girl LOVES gummy snacks so I thought this would be fun a great way to talk about letter G and it's sound (everything is more fun with food, right???).  First, Sweet Girl will paint the pots green; then she'll add a few scoops of graham cracker crumbs as our dirt.  Finally I'll have her "plant" the gummy worms, gummy bears and gummy fish. 


As always, be sure to check back at the end of the week to see our fun letter G crafts!!

Tuesday, March 22, 2011

Momma made...Toy organization & Homemade Tag Tutorial

My husband says I'm a little crazy when it comes to organizing!!  I am a firm believer that everything has a place and everything should be in it's place!!  But boy do those toys start to take over after a while!!!  Sweet Girl is actually pretty "neat" when it comes to playing and will often put her toys away when she is done (PLEASE let this continue through the teenage years!).  In one of my crazy efforts to get organized I made little tags to attach to the baskets in our playroom.  They are so simple to make and definitely help with keeping things organized. 

These are a couple of the MANY tags I have for our baskets.


The liner of the basket is perfect for hanging the tag.


And here's how easy they are to make....

First, gather your supplies.
You'll need some unfinished wooden tags, paint, alligator clips, glue gun and alphabet stickers. The wooden tags pictured here are from Michaels.  They offer several different shapes and are super inexpensive (about $.50 each).  You can find the alligator clips in the jewelry section at most craft stores.  The alphabet stickers are also from Michaels (but you can purchase them online here).


Next, paint your unfinished wooden tags and let dry.  I used a gloss based paint because it has a little more shine to it than regular acrlyic paint.


After your paint dries, flip over the wooden piece and glue one of your alligator clips to the back using your glue gun.  Make sure the clasp of the alligator clip is facing in the correct direction for your basket or liner.  For this tutorial the clip is facing down, however, for the basket liners pictured above I had to reverse the clip.


And finally...add your stickers.

Ah.....I love being organized!!


I'm linking up to....

 
Related Posts Plugin for WordPress, Blogger...